How is fiber internet installed in a home?
Understanding how fiber internet is installed in your home demystifies the process, offering clarity on the technology that powers your ultra-fast connection. This guide breaks down the installation steps, from the initial site survey to the final activation, ensuring you know what to expect.
What is Fiber Internet and Why is it Different?
Fiber internet utilizes thin strands of glass or plastic to transmit data as pulses of light. Unlike traditional copper-based technologies like DSL or cable, which transmit data as electrical signals, fiber optic cables offer significantly higher bandwidth, lower latency, and greater reliability. This fundamental difference in transmission medium is what makes fiber internet installation a distinct process, often requiring specialized equipment and techniques to bring these light-speed capabilities directly to your doorstep. In 2025-26, the demand for symmetrical upload and download speeds, a hallmark of fiber, continues to surge, driven by cloud computing, remote work, and high-definition streaming.
The Fiber Internet Installation Process: A Step-by-Step Breakdown
The journey of fiber internet from the network's backbone to your home is a multi-stage process, meticulously managed by internet service providers (ISPs). Understanding each phase can alleviate concerns and ensure a smooth transition to this advanced technology. The overall goal is to establish a direct, high-capacity connection that can support the ever-increasing demands of modern digital life.
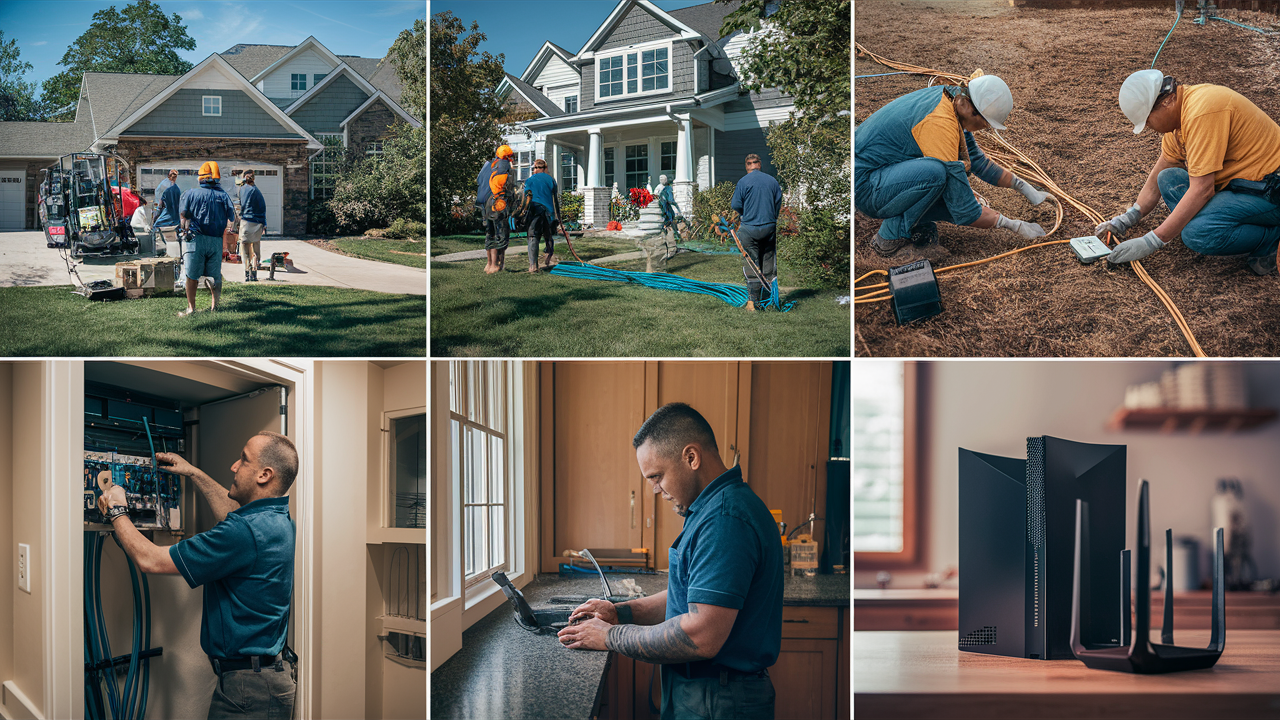
Pre-Installation Planning and Site Survey
Before any physical work begins, a crucial planning and assessment phase takes place. This involves understanding the existing infrastructure, determining the most efficient route for the fiber optic cable, and identifying potential obstacles. A site survey is typically conducted by an ISP technician or a specialized contractor. They will assess:
- The location of the nearest fiber optic network point (e.g., a street cabinet or pole).
- The best path for the fiber cable to reach your home, considering property lines, existing utilities, and landscaping.
- The optimal entry point into your home (e.g., through a wall, window, or existing conduit).
- The desired location for the Optical Network Terminal (ONT), the device that converts light signals to electrical signals your devices can use.
This initial survey is vital for minimizing disruption and ensuring the installation is performed safely and effectively. In 2025, ISPs are increasingly using advanced mapping and GPS tools to streamline this process, often allowing for remote assessments before a physical visit.
Outside Plant Work: Connecting to the Network
This is the most extensive part of the installation, involving the physical laying or deployment of fiber optic cables from the ISP's network infrastructure to your property. The method used—aerial or underground—dictates the specifics of this stage. The objective is to establish a continuous fiber optic path to the exterior of your home.
- Aerial Installation: If your neighborhood has existing utility poles, fiber optic cables may be strung from pole to pole, eventually reaching a demarcation point on the exterior of your house. This is often quicker and less disruptive to existing landscaping.
- Underground Installation: This involves burying fiber optic cables. Depending on the area and existing infrastructure, this can be done through trenching (digging a trench to lay the cable) or, more commonly in modern deployments, through directional boring or micro-trenching.
During this phase, specialized equipment is used to pull, splice (join), and secure the fiber optic cables. Splice closures are used to protect these delicate connections from the elements. The 2025-26 infrastructure build-out prioritizes undergrounding in many new developments for aesthetic and durability reasons.
Inside Wiring and Equipment Installation
Once the fiber optic cable reaches the exterior of your home, the installation moves indoors. A small hole is typically drilled through an exterior wall to allow the fiber cable to enter. This cable is then routed to the designated location for the ONT. The ONT is a critical piece of equipment that translates the optical signals from the fiber cable into electrical signals that your router and devices can understand.
- ONT Placement: The ONT is usually installed in a central location, such as a utility closet, basement, or garage, to facilitate easy connection to your router.
- Fiber Termination: The fiber optic cable is carefully terminated at the ONT. This involves stripping the protective layers and connecting the glass fiber to a special connector on the ONT. This process requires precision to avoid damaging the delicate fiber.
- Router Connection: An Ethernet cable then connects the ONT to your home router, which distributes the internet signal throughout your home via Wi-Fi or wired connections.
Many ISPs provide their own routers, which are optimized for their fiber networks. The installation of these devices is usually straightforward, ensuring minimal disruption to your living space. For homeowners looking to maximize their network, understanding the placement of the ONT and router is key to optimal Wi-Fi coverage in 2025.
Testing and Activation
The final stage involves rigorous testing and activation of the service. The technician will connect their testing equipment to the ONT and router to verify signal strength, speed, and connectivity. This ensures that the installation has been successful and that you are receiving the internet speeds you signed up for.
- Signal Strength Tests: Technicians use optical power meters to ensure the light signal is strong and clear.
- Speed Tests: Multiple speed tests are conducted to confirm that upload and download speeds meet the advertised rates.
- Connectivity Checks: The technician will ensure that your devices can connect to the network and access the internet.
- Service Activation: Once all tests are satisfactory, the ISP activates your service on their network, and you can begin using your new fiber internet connection.
This comprehensive testing phase is essential for guaranteeing a high-quality internet experience from day one. In 2025, ISPs are focusing on remote diagnostics and activation to further expedite this final step.
Fiber Installation Methods: Variations to Consider
The physical deployment of fiber optic cables to a home can vary significantly based on the existing infrastructure, local regulations, and the ISP's deployment strategy. Understanding these methods can provide insight into why certain installations might appear more or less intrusive than others.
Aerial Installation
Aerial installation is common in areas where utility poles already exist for electricity and telephone services. Fiber optic cables are attached to these poles and strung to individual homes. This method is generally:
- Faster to deploy: It often requires less ground disruption compared to underground methods.
- Less expensive: The cost is typically lower due to the reuse of existing infrastructure.
- More susceptible to weather: Aerial cables can be more vulnerable to damage from storms, falling branches, or ice.
- Aesthetically less pleasing: Some find the visible cables to be unsightly.
The connection from the pole to the house is often a single strand of fiber, carefully secured and routed to the entry point. In 2025, aerial deployments are still prevalent in many suburban and rural areas where the cost of undergrounding is prohibitive.
Underground Installation
Underground installation buries fiber optic cables, offering a cleaner aesthetic and greater protection from the elements. This method can be achieved through several techniques:
- Trenching: A traditional method involving digging a trench to lay the fiber conduit or cable. This is more disruptive to landscaping but provides a direct burial path.
- Directional Boring: This technique uses a specialized drill to create a bore path underground, pulling the fiber conduit or cable through it. It minimizes surface disruption and is ideal for crossing driveways, roads, or sensitive areas.
- Ploughing: A specialized machine cuts a narrow furrow in the ground and lays the cable or conduit simultaneously. This is efficient for large areas but can still cause some surface disturbance.
Underground installations are generally more expensive and time-consuming than aerial ones, but they offer superior durability and are preferred for new developments and urban areas where aesthetics are a priority. By 2026, underground fiber deployment is expected to continue its growth in metropolitan regions.
Micro-Trenching
A more recent and increasingly popular method for underground fiber deployment is micro-trenching. This technique involves using a specialized saw to cut a very narrow, shallow trench (typically 1-2 inches wide and 12-18 inches deep) in the pavement or soil along the edge of a road or sidewalk. The fiber conduit is then blown or pulled into this trench, and the cut is sealed with a polymer or asphalt compound.
- Minimal disruption: Significantly less invasive than traditional trenching.
- Faster deployment: Can be completed much more quickly over large distances.
- Cost-effective: Often more economical than traditional trenching for extensive network builds.
- Durable: The sealed trench is highly resistant to water and debris ingress.
Micro-trenching is a key technology enabling rapid fiber expansion in urban and suburban environments in 2025-26, balancing cost, speed, and minimal disruption. For more on the benefits of fiber, explore the advantages of fiber optic internet.
What to Expect During Your Installation Appointment
The actual installation appointment is when the fiber optic cable is brought into your home and your service is activated. Being prepared can make the process smoother for both you and the technician.
Scheduling and Communication
Once your fiber service is approved, you'll work with the ISP to schedule an installation appointment. This typically involves:
- Window of Arrival: ISPs usually provide a window of time (e.g., 8 AM - 12 PM) during which the technician will arrive.
- Confirmation Calls: You may receive a call the day before or the morning of the appointment to confirm.
- Technician Contact: In some cases, you might receive a text or call when the technician is en route.
It's crucial to provide accurate contact information and be available during the scheduled window. If you cannot be present, ensure an adult (18+) who can authorize work and make decisions is there.
The Technician Visit
Upon arrival, the technician will typically:
- Introduce themselves: They will confirm your name and the service being installed.
- Review the plan: They may briefly re-confirm the planned entry point into the home and the location for the ONT and router.
- Perform the work: This involves running the fiber cable from the outside demarcation point into your home, installing the ONT, and connecting it to your router.
- Test the connection: They will conduct thorough speed and connectivity tests.
- Explain the equipment: The technician will usually explain how the ONT and router work and answer any basic questions you may have.
The entire process typically takes between 2 to 4 hours, depending on the complexity of the installation and the home's layout. Technicians are trained professionals equipped to handle the delicate nature of fiber optics.
Homeowner Responsibilities
While the ISP handles the technical installation, homeowners play a role in ensuring a smooth process:
- Clear access: Ensure clear pathways to the exterior entry point and the interior ONT/router location. This means moving furniture, clearing clutter, and ensuring any pets are secured.
- Decision-making: Be prepared to confirm the exact placement of the ONT and any internal wiring runs.
- Power access: Ensure there is a nearby electrical outlet for the ONT and router.
- Authorize work: Be present to sign any necessary paperwork or authorize drilling through walls.
Having a clear understanding of where you want your equipment installed beforehand will save time and prevent potential issues. For those planning a new build or renovation, integrating fiber conduit during construction is highly recommended. Learn more about planning for fiber optic internet in new construction.
Potential Challenges and Solutions
While most installations are straightforward, some challenges can arise:
- Difficult entry points: Thick walls, difficult-to-access crawl spaces, or existing conduit obstructions can complicate running the fiber cable. Solutions might involve alternative entry points or more specialized tools.
- Long cable runs: If the nearest network connection point is far from the house, longer cable runs might be needed, potentially increasing installation time or cost if outside standard service areas.
- Existing infrastructure issues: Older homes might have wiring challenges that require creative solutions.
- Permitting delays: In some municipalities, permits are required for trenching or drilling, which can sometimes cause delays.
Experienced technicians are adept at overcoming these obstacles. Clear communication with the technician about any concerns you have is key to finding the best solution. In 2025, ISPs are investing in better training and technology to mitigate common installation challenges.
Fiber Installation vs. Other Technologies
The installation process for fiber internet differs significantly from that of other common broadband technologies, primarily due to the nature of the cabling and the required equipment.
Fiber vs. Cable
Cable internet uses coaxial cables, the same type used for cable television. The installation typically involves connecting a coaxial cable from a wall outlet to a modem. If a new line is needed, it's often run from a street-level connection point. The process is generally less invasive than fiber installation, as the infrastructure is often already in place.
Fiber installation, as detailed above, requires running a new, dedicated fiber optic cable to the home and installing an ONT. While potentially more involved, it delivers vastly superior performance. By 2026, the performance gap will continue to widen, making fiber the preferred choice for future-proofing.
Fiber vs. DSL
DSL (Digital Subscriber Line) internet uses existing copper telephone lines. Installation is usually the simplest, often requiring just plugging a DSL modem into a phone jack. No new lines are typically run to the home, and the process is minimal. However, DSL's performance is limited by the distance from the telephone company's central office and the quality of the copper lines.
Fiber installation, by contrast, is a more substantial undertaking because it involves deploying entirely new infrastructure. However, the resulting speed, reliability, and capacity are orders of magnitude greater than DSL, making the installation effort worthwhile for most users seeking high-performance internet in 2025.
Fiber vs. 5G Home Internet
5G Home Internet is a wireless technology that uses cellular signals to provide internet access to a router inside your home. Installation is typically very simple: a technician installs an outdoor 5G receiver (or you might self-install), and a router is set up inside. There's no physical cable running into the house from the network.
Fiber installation is a wired process, bringing a physical cable directly into the home. While 5G offers convenience and can provide competitive speeds in some areas, fiber remains the gold standard for consistent, high-speed, low-latency performance, especially for symmetrical upload/download speeds crucial for modern applications. By 2025-26, fiber is expected to maintain its lead in terms of ultimate speed and reliability, even as 5G technology matures.
Cost and Time Factors in Fiber Installation
The financial and temporal investment in fiber internet installation can vary, influenced by several key factors.
Typical Installation Costs
Many ISPs offer free or heavily subsidized installation for fiber internet, especially when bundled with a service contract. However, costs can arise in specific situations:
- Standard Installation: Often $0 to $100, with many providers waiving this fee.
- Complex Installations: If significant trenching, long cable runs, or specialized equipment are required beyond the standard setup, additional charges may apply. These can range from $100 to several hundred dollars, depending on the scope.
- Self-Installation Kits: Some providers might offer these for simpler setups, potentially reducing costs.
It's always best to clarify installation fees with your chosen ISP during the sign-up process. In 2025, the competitive landscape means many ISPs are absorbing installation costs to attract new fiber customers.
Installation Timeframe
The duration of a fiber installation can be categorized into two main aspects:
- Scheduling Lead Time: This is the time between signing up for service and the actual installation appointment. This can range from a few days to several weeks, depending on the ISP's backlog and the availability of technicians in your area.
- On-Site Installation Time: As mentioned earlier, the time the technician spends at your home typically ranges from 2 to 4 hours for a standard installation. More complex setups may take longer.
The speed of network build-out also impacts availability. Areas where fiber is newly being deployed may have longer lead times for appointments compared to established fiber zones. By 2026, as fiber networks mature, scheduling lead times are expected to become more consistent.
Future-Proofing Your Home with Fiber
The installation of fiber optic internet is more than just an upgrade; it's an investment in future-proofing your home's digital infrastructure. The inherent capabilities of fiber—its massive bandwidth, low latency, and immunity to electromagnetic interference—mean it can easily handle the increasing data demands of tomorrow. From immersive virtual and augmented reality experiences to advanced smart home devices and seamless 8K streaming, fiber provides the robust foundation needed. By understanding the installation process, homeowners can appreciate the commitment involved in bringing this cutting-edge technology to their doorstep. The meticulous steps, from outside plant work to precise inside wiring and thorough testing, ensure a reliable and high-performance connection that will serve your household's needs for years to come. Choosing fiber today means avoiding the need for future upgrades as technology continues its rapid advancement.
In conclusion, the fiber internet installation process, while seemingly complex, is a well-defined procedure designed to bring unparalleled speed and reliability to your home. It begins with careful planning and site surveys, progresses through the physical deployment of fiber optic cables via aerial or underground methods, and culminates in the installation of essential equipment like the ONT and router. Rigorous testing and activation ensure your service is ready to go. While challenges can arise, experienced technicians are equipped to handle them, and homeowner cooperation is key to a smooth experience. Compared to cable, DSL, or even 5G home internet, fiber offers a superior and future-proof solution, with many ISPs offering competitive installation costs and reasonable appointment lead times. Embracing fiber installation is a strategic move for any household looking to stay ahead in the digital age.